


A Journey From ESXi to Proxmox In Three Acts
Part 3 - Movin' On Up

Previously On…
In part two, I discussed proving out Proxmox in a functional lab scenario, and then evaluated all my requirements to make a decision. Having completed that, it was time to get started on getting Proxmox into production, and migrating over the VMs.
Taking Stock
Ok, here what we have to work with for the environment.
Dell R620 Server (backup compute )
Synology 4 Bay DiskStation DS920+ (primary storage)
Synology 2 bay NAS DiskStation, DS216J (secondary storage)
Mini PC NAB6 (new) Intel Core i7 32GMem 1TB Storage for primary compute
Old Desktop running ESXi (retirement target)
VM inventory: Home Assistant, Untangled, Windows with Plex,
two Ubuntu Pi-Hole Installs, Windows Backup Server
Tasks
Install Proxmox on R620
Export VMs off old desktop ESXi with OVF tool (requires downtime of VM)
Start up migrated VMs on R620, test and validate
Install Proxmox on new (adorable) mini-pc
Create two node cluster, one active (minipc) and cold standby (R620)
Migrate VMs to (adorable) minipc, create backup schedule.
Decommission old Desktop
Let’s Get This Party Started
R620 Install
Ok, the first step was to wipe the R620 and get PVE installed. This process was vetted in the POC, so smooth sailing. Definitely remembered to set the max root to leave plenty of space for the thin disk. After install, networking was reconfigured to tag all traffic for 8021.Q support.
VM Migration - PVE Guide Here (link)
This went a tad rougher than I expected, but as I mentioned in part two, after installing the OVF tool on PVE I found I needed to first enable SSH on ESXi, then instead of running this initially:
ovftool vi://root@<ip-of-esxi>/<name-of-a-virtual-machine>Run this: ovftool vi://root@<ip-of-esxi> then authenticate to the appliance to see a list of VMs and then run the prior command to copy them over.
My Untangled VM moved over flawlessly, I was able to follow the process, fire it up, remap the interfaces, and it ran with no issue.
Home Assistant was another issue. I migrated it, but it wouldn’t fully boot.
Tteck to the rescue! I ran the Home Assistant OS VM script and it spun up a brand new VM, no problem. I have automated backups that run daily inside of HA, and export to Google Drive, so I restored it and it was back up. I wasn’t done yet though.
My HA install needs two radios to talk to the HA network, one Zigbee, and one Zwave. Both are USB, so I needed to pass them through to the VM. The process is pretty straightforward, but I feel it’s worth some explanation. In the hardware section of the VM, Add USB. So I can see the Conbee, but where’s my Zwave stick?

I can SSH into PVE and run lsusb or just use the shell in PVE to do the same thing. I like the pretty colors SecureCRT gives me, so I’ll do that.

So I think this is a bug in PVE where the window doesn’t list out all devices. Not a problem, all I need is the pair of values separated by the colon anyway. Simply copy and paste that into the prompt. (The poorly spelled word was auto-filled, so I didn’t fix it)


I added that, and both radios worked and HA was up and running. When I get the (adorable) minipc up and running I’ll follow this same process to get that operational after migration.
HA Protip: You want to get the radios away from the USB ports, especially if it’s USB 3.0 due to interference. USB extenders fix this issue. Also, I had issues with the (adorable) minipc and my Zwave Aotec stick. It would not show up when in the port. I used a USB-A to USB-C adapter and it worked just fine after that. dmesg is a great command to use to see what those devices are up to and look for issues.
I started to migrate Windows/Plex/PiHole, but then I stopped. I noticed an option I didn’t see before, “Create CT” I did some research on it, and I’m glad I did because from a technology and use-case perspective, it was life-changing.

I Can Barely Contain Myself!
So CT means “container”, specifically LXC=Linux Container. This is different then Docker. I’m not going to get terribly in the weeds here, but basically LXC is way to install Linux distros for all intents and purposes on bare metal with very little resource requirements. Docker is more of a containerization of applications. I may not have that EXACTLY right, but close enough.
So PVE supports LXC right out of the gate. For a long time I’ve had reservations about running Plex and PI-Hole in full OS’s it just seemed like a waste. I didn’t have much experience with docker so I just pressed on.
So could I simply deploy these in containers? YES. YES I CAN. Now, I could go through the process of downloading a template and then manually install the apps, or I could go and visit ttkek again! Yes, there are scripts for PI-Hole containers and Plex!
Let’s goooooooooo!
Pi- Hole was a breeze. I backed up the settings from the current installs
(Prod and IOT networks) and then ran the scripts and created the containers. I then restored the configs and I was back in business. Man, they are FAST. Before for maintenance/updates it would take about 30 seconds or so after reboot to come back up. In the container, it’s damn near instant. /swoon In terms of resources I gave them 1CPU, 254Mb of RAM and 20GB drives. In operation though these guys never exceed 60Mb of RAM, so I’m likely going to draw those down later.
Plex was a bit more involved, I had to back up the data directory, run the script, install the container and then migrate that data over. Plex of course has much more disk space/CPU/Memory allocated to handle transcoding if needed.
Note: The script also has the advantage of enabling options for hardware transcoding if you want it. I don’t transcode a lot, but when I do it FLIES. I allocated 4CPUS, 30GB disk (all media files all elsewhere) 1GB RAM. All in all, this is a huge resource savings off the prior installs. And just like with the PI-Holes, startup is damn near instant. Someone fetch me my fainting couch, I’m feeling woozy.
So the final part on Plex is that I store my media files on a NAS. While I did NFS for backups, I found that to be a serious PIA for this, so I opted for SMB instead. I installed the CIFs pre-req, then created a directory, /mnt/plex for mounting. Then in fstab, I added: //[NAS IP]/media/plex /mnt/plex cifs rw,dir_mode=0777,file_mode=0777,vers=3.0,username=someguy,password=nunyadamnbusiness-9 0
Ran mount -a -v and I was off to the races! I remapped all my libraries and was all set.
Note: In order for Plex to work correctly I set the container to be privileged.
Primary Compute Is Dead, Long Live Primary Compute!
Now that I had all the VMs up and running on Proxmox, it was time to pour one out for the old boy and shut it down. Then install Proxmox on the new (adorable!) minipc.
So no need to cover the install in depth, don’t forget to set maxroot, configure the networking for 8021Q and for LACP. I didn’t cover that in the POC so let’s dive into that quickly.
They Call Me Bond. Linux, Bond.
In PVE, the network construct is called a “Linux Bond”, and there’s several different flavors.
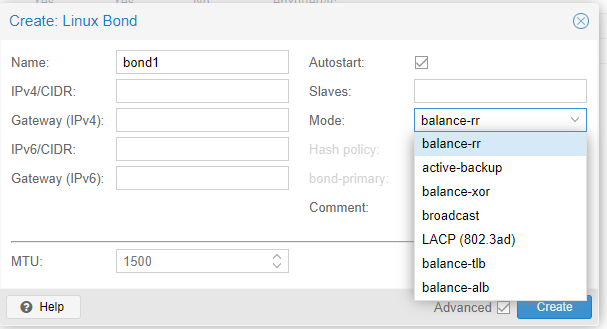
I first tried the balance-rr and active-backup but for whatever reason that wasn’t a stable setup for me at all. I decided to fall back on LACP, and that worked perfectly.
Note: If you’re reading this I assume you know how to setup a LACP port-channel on the switch side.

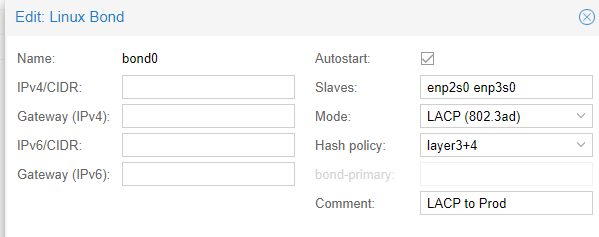
For my hash, I chose 3+4, since the things most likely to change on my network are IP/port. It’s totally possible I’m misunderstanding this but I’m getting really good 1Gb+ performance over the links.so….*shrug*.
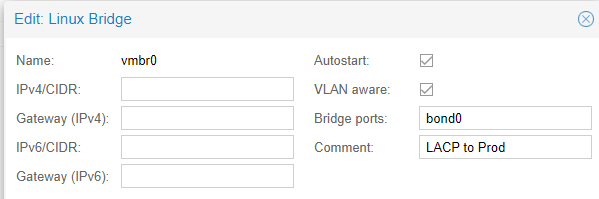
The way to set this up is to remove the ports off your bridge connected to the switch, create the bond, add the ports used on the bridge to the bond, and choose your bond mode. The default name is bond0, so then take that name and add it to the bridge where the previous ports were removed.
Apply, and reconfigure the switch side to match connection types.
Note: Remember from the POC, that the GUI isn’t great about updating that the change is successful when there’s a loss of connection. I like to start a continuous ping before applying and giving it a moment. If it pings, great, refresh the page and press on. If not, console in and visit our friend at /etc/network/interfaces and revert, or fix it. Just don’t forget to run ifreload -a after the change to make it take effect.
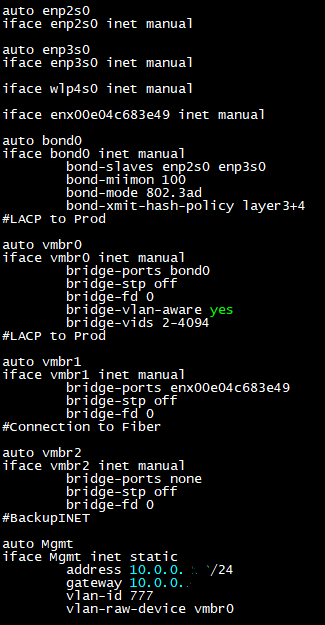
Above is an example of a working config. Time to move on.
Cluster All the Things!
I want to easily be able to live migrate the VMs, so I created a cluster.
Details of that process are in Part2. Remember that I mentioned that adding a node that has VMs on it beforehand to a cluster is a real PIA. You can create new a cluster just fine though on the node that has existing VMs. So I created the cluster on the R620 and then added the (adorable) minipc.
In a PVE cluster there is no "master” node, which is neat. Manage the cluster from whatever node you wish. So then I performed a live migration and de-populated the R620 and shut it down. That box is much more power-hungry, and it’s only there as a backup if the (adorable) minipc goes down or running updates. I’ll bring it up from time to time to update PVE so the two don’t differ in versions.
If you practice this strategy, you’ll notice that all of a sudden the cluster is read only. That’s because corosync works on a quorum, and if it falls below the expected “vote” it goes read only. There’s multiple way around this like a witness node, etc but the simplest way is to tell PVE the number of votes expected is 1 with the command.
pvecm expected 1
For my two node cluster needs this is a perfectly cromulent strategy, but you do you.
The node will then be writable. This command will need to be ran any time a node in your two node cluster is started/shutdown, as the sync will change the votes dynamically. The pvecm command has multiple arguments, like status, node, etc.
You’ve Got Mail
EDIT:
As of 11/24/2023 and version 8.1.3 PVE now supports the configuration of notifications from the datacenter GUI! I’ll leave the manual/script section intact, but as of now it’s vestigial.

PVE does support email notification, but the configuration is all cli. And it’s not fun for your average linux newbie. There is a “Proxmox Toolbox” script you can wget that has a bunch of handy tools, and smtp is part of it. It’s especially useful if your email server requires encryption.
https://github.com/Tontonjo/proxmox_toolbox

A couple of points on this. My email provider requires port 465, which necessitated I add a couple of lines outside the script. The “test” function alerted me to it.
nano /etc/postfix/main.cf
I added: smtp_tls_wrappermode = yes
smtp_tls_security_level = encrypt
Then ran
service postfix restart
I HIGHLY recommend tailing the log from another session after running the reload. It provides very useful information about the state of the mail service. tail -f cat /var/log/mail.log
Big Brain Backup Strat
So in Part2 I mentioned that I run the PVE Backup Server ON PVE. Some may find that silly but here’s the plan.
Backups are stored on two different NAS devices, not directly on PBU.
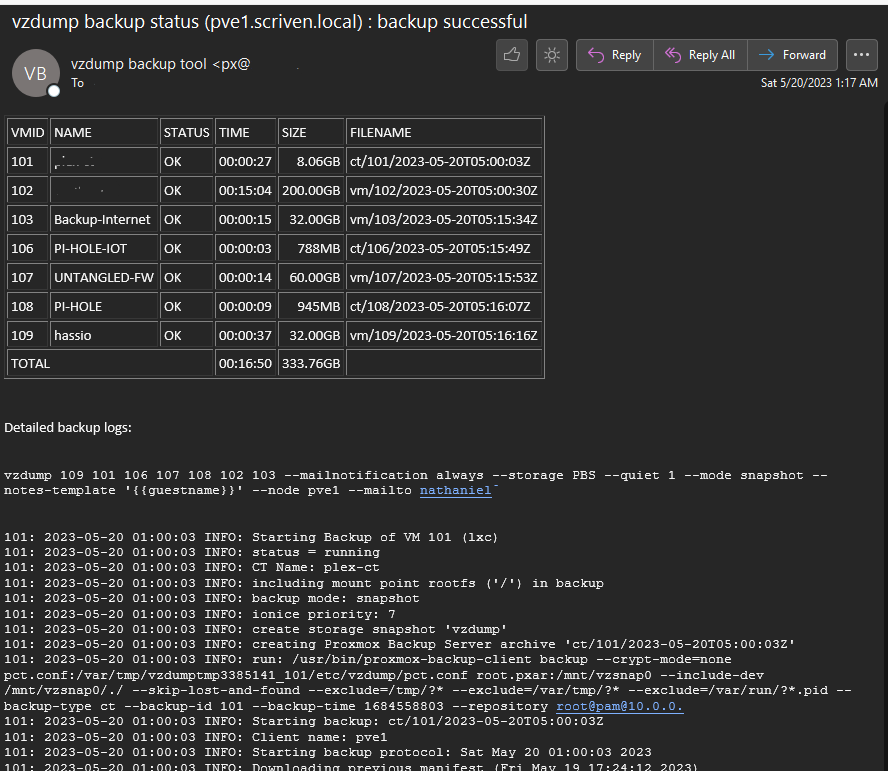
Primary backups are stored every day invoked by PBU to my 4 bay NAS. The only VM not backed up is PBU itself, because I think that would maybe create a runtime error in reality itself. (that, and it doesn’t work)
Weekly fulls are invoked by the cluster itself, to NAS2 and that does include PBU.
I use the pruning feature to keep the last 16 backups of each method


This ensures I have good daily backups with live restore features, and a way back completely if NAS1 shits the bed. The email address sending notifications must be added to the backup job when created.
There, And Back Again.
Well, that’s it. There’s the journey. Does PVE have a real place in the enterprise? Maybe, but VMWare does have a very full featured (and eye-wateringly expensive) feature set that PVE doesn’t have in parity, and doesn’t claim to. But is it right your you home lab/home virtualization needs?
In my opinion 1000% yes. PVE at every step of the way exceed all my expectations. And while maybe not as “easy” as a more mature hypervisor, the cost and opportunity to learn something new and exciting was worth all the time spent.
I hope you found this informative and useful.
Until next time.